19 July, 2018DIY & FREEBIE
Make your own great DIY school cone - including templates
 First day of school. Wow, this is such an exciting event in the lives of our little Schietbüdel. (And also in ours as parents, phew!) Since we in the Kleine Prints team, first and foremost our Founder EvaIf you're a DIY fan and enjoy creating beautiful things, we've landed another special treat for you this week. DIY expert Julia Tramm from studio tong tongwho already have a great Easter egg DIY and super cool masks has designed for you and for us, is having a creative romp today in the form of a pencil school cone. We wish you lots of fun discovering and crafting!
Material
For this pencil school bag, you will need cardboard in yellow, pink and natural (50x70cm) and in blue (A4). You will also need scissors, hot glue, a compass, pencil, ruler, a white paint marker, glue, silver fabric tape, possibly a folding leg and the printed templates. You can download the templates Download here free of charge.
Make your own school cone: The steps
1) For the body of the school cone, spread out the yellow paper. Mark 10cm wide sections on the long edge and draw them across the whole sheet. This way you have 6 sides for the pen body plus a wide glue edge. 2) Fold the cardboard along the marked lines. The best way to do this is to fold the cardboard over the edge of a table, then fold the cardboard correctly and tighten the fold with a folding leg.
 3) Trace the folded edges on the outside of the cardboard with a white paint marker so that the school cone has the typical pencil look. On one side, trace slight arches between the folded edges and cut them out. 4) Transfer the template for the lace 6 times onto the natural coloured cardboard so that the long edges all line up. Add an extra lace as a glue edge (but this one without the flap on top). Cut out the whole thing.
 5) For the coloured pencil tip, cut out a semicircle from blue card (radius 8cm). Glue it to the back of the cut-out lace. Cut off the excess. Now fold the lace along the lines you have drawn. 6) Apply hot glue to the sheets of yellow cardboard one after the other and press the tabs of the lace onto them. Apply hot glue to the glue flaps of the tip and the pen and join the whole pen body together.
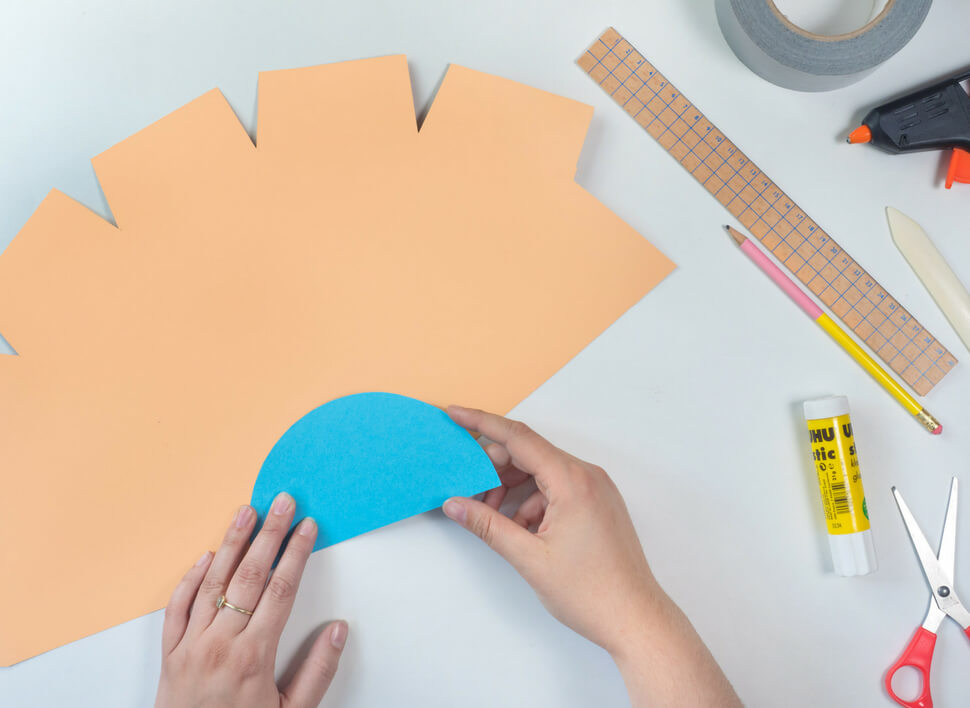
 7) Stick silver fabric tape on the end of the pencil body. This will later represent the metal piece that holds the eraser. 8) Transfer the pattern for the eraser twice onto pink card to make a dodecagon. Cut it out. Cut the lines drawn through the template on the dodecagon.
 9) Fold all edges of the eraser well. Coat the small triangles on the side flaps with hot glue and glue them to the side flap next to them. Now you have a kind of hexagonal bowl. 10) Cut two adjacent edges of the eraser. Glue the resulting tab to the pencil body with hot glue. Now fill the pencil body with sweets and small gifts for the start of school. Close the pencil with the eraser as a lid. That's it! Note: Fix the lid with a drop of hot glue as needed, so that you can't start school too early, hehe.
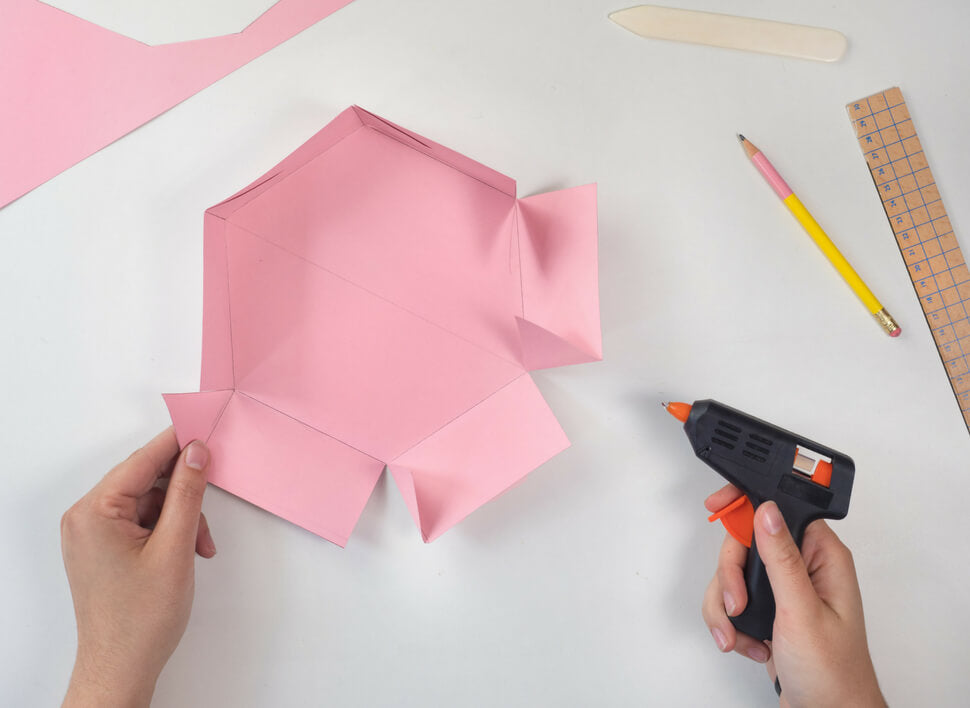
 The Kleine Prints team and Julia Tramm wish you lots of fun making your own school cones and giving them as presents! By the way: As decoration or photo props for your first day of school party, the following are suitable our great ABC postcards quite wonderful. (See photo at the bottom.)
  We are looking forward to receiving your finished school cones at the Instagram and tag us with @kleineprints or the hashtag #kleineprints .
Fancy more great stories, cool DIY ideas and simply good entertainment?
Would you like a newsletter that really entertains you? Not just dumb advertising, which your email inbox already has more than enough of? Then you've come to the right place with our newsletter, the Kleine Sonntagspost! In it you will regularly read helpful, entertaining and beautiful stories about the colourful life with children. 0% spam, 100% love. Get to know our Kleine Sonntagspost now. We look forward to meeting you!Image source: All images in this post are by Julia Tramm.


