Make the most beautiful photo book easily yourself

Oh, a photo book is something really fine. Whether it's for a birthday, after the last vacation, for the start of daycare or just as a sweet gesture in between - cause you know, small gifts keep the friendship & so. To create your own photo book for a little or big someone is one of the most personal gift ideas.
That's how the Kleine Prints photo book came about - as a gift for my daughter Lotta when she started kindergarten (you can read the whole story here). And of course, the idea led to the fact that you can now create a great photo book for your little sweetheart. Without big Bohai and really quite simple on the computer or smartphone.
Even more individual is then only a homemade photo book. And because I find the idea at least as beautiful, I asked my dear friend Kirsten to let her creative vein properly throb and make a photo book itself. You can't imagine how happy I was when she agreed. And now I proudly present you the result including a super detailed step-by-step tutorial.

The DIY photo book to make yourself
The tutorial I'm sharing here is for a Leporello photo book. These are those books in which you do not leaf through, but you can unfold them like an accordion and even put them down.
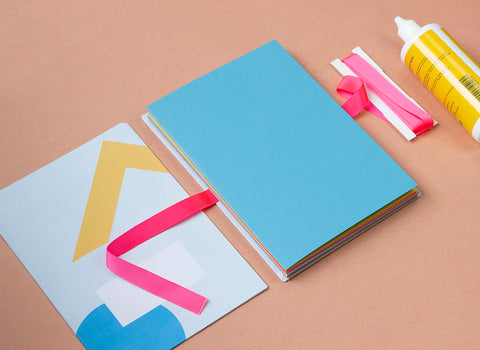
For the Kleine Prints DIY Photo Leporello you need:
- Colored paper in DIN A4, preferably a bit firmer
- Gray board, 2x and cut to 155 x 215 cm
- Beautiful ribbon, for example, rep ribbon
- The Kleine Prints template for the front and back of the photo book (It comes in two color variations. Just click on the link and download both for free).
- Embellishments, for example, glue dots, stamps, washi tape, etc.
You will also need
- Adhesive
- Cutter knife
- Ruler

And this is how the photo book is made
Step 1:
First, all the colored pages are folded in half and set up as in the picture. 


Step 2:


When you're done with that, you'll have a long strip of paper that slides open and closed like an accordion.

Step 3:
Now cut out the fronts and backs and draw them onto the gray board (if you don't already have the templates, here you can download them - free of charge, of course!).
First take the front side, fix the corners first and then fold the side edges. Do the same again with the back.


Step 4:
Now connect the sides with the covers. Put the back side in front of you so that you look at the gray side. There you now fix the ribbon in the middle. 

Now glue the inside pages of the book on it. 
Then put the lid on and glue it in place.
Step 5:
When everything is dry, it's time to design the contents. Especially suitable for this are our wonderful new photo prints, which you can easily order in my store in the formats 10x10 cm, 10x15 cm or 13x18 cm. We print the photo prints on somewhat firmer, but velvety soft natural paper with a matte finish. I am thrilled with the quality and promise you will be too!

TIP: Order the images for your homemade photo book in different sizes. The format mix helps you to make your photo book even more unique!
Step 6:
When all the pictures are in the right order, glue them down and decorate the pages. You can either write a small personal message or decorate the pages with glue dots, washi tape or stickers.


Now your homemade photo book is finished and ready to put a smile on the face of one of your loved ones (or yourself?).

I wish you much fun with photo book crafting and gifting!
Love,
Your

Naaa, late again?
If you don't want to wait long and want to start designing right away, then create one of our wonderful photo books for kids. Here you'll find our four classics - or are you more in the mood for a Kleine Prints special edition?

Nothing more forgotten?
Nothing could be easier. Just bookmark your favorite photo book on Pinterest and you'll have the instructions right at hand when you need them. By the way, I do the same - here you will find, for example, my collected craft ideas for children or charming DIYs. If you like, then follow me on Pinterest - that would make me happy.


